Microsoft Office – The Basics of Macro Creation
Create your first Macro
We are going to start with a nice and simple “Hello World!” message box. In whichever of the Office applications you wish to start with, hold down Ctrl + F11 or simply click on the Visual Basic button in the Developer ribbon.
If it is not already expanded, expand the document folder structure on the left until you are at the active document. Double click on it. The naming for the document you are going to open is:
| Application | File to Open |
|---|---|
| Microsoft Word | ThisDocument |
| Microsoft Outlook | ThisOutlookSession |
| Microsoft Excel | Sheet1(Sheet1) |
| Microsoft Publisher | ThisDocument |
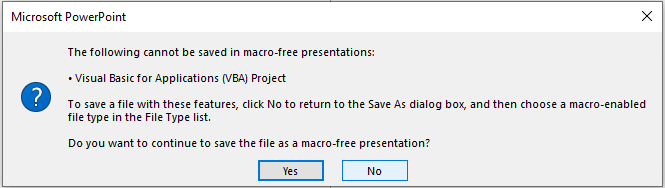
You will note that PowerPoint is missing from the list above, this is because adding a script to PowerPoint is a little different. It has to be done as a module within a macro enabled file. This requires two extra steps:
- Go to File > Save As and save the file in the .pptm format, or else you will get the error displayed below;
- Within the VB Editor, simply right-click on the top level VBA Project(filename.pptm) and select Insert > Module.
That done, we can now add our first executable piece of code:
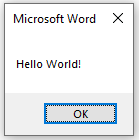
Sub HelloWorld()
    MsgBox "Hello World!"
End Sub
There a few different ways we can execute this code. Directly in the VB Editor:
- Press the F5 key on the keyboard;
- Clicking on the Play(>);
Or from the main application window using the Macros button on the Developer Tab. The end result should be the same:
Congratulations! You have just created your first VBA Script in Office. There are differences in the command compatibility and the way in which VBA interacts with the applications, this will be expanded upon in separate articles.